
Sometimes network administration is easy. You run request system software add ..., reboot the switch, and you’re done. And sometimes Junos answers with the timeless classic: “No space left on device.” Of course it does. Exactly when you need to install an important Update…
So what do you do when /var/tmp on an EX4300 doesn’t have enough space for the image (or pretends it doesn’t)?
That’s right: You go one layer deeper 😀 😉
The first important detail is that an EX4300-48MP with this architecture isn’t simply “Junos on bare metal”. There is a Linux-based hypervisor underneath it and getting there isn’t quite as hard as you might expect.
From the Junos CLI, you first run:
start shell user rootThis gives you the Junos shell. It does not give you the hypervisor. From there, you can use a command that isn’t obviously documented and that surprisingly few netadmins (including myself) didn’t find out until recently:
hshellNow you’re actually logged into the Linux hypervisor. You’ll see a prompt similar to:
root@ITC-JUN-ENT-CF-LE-01-node:/var/tmp#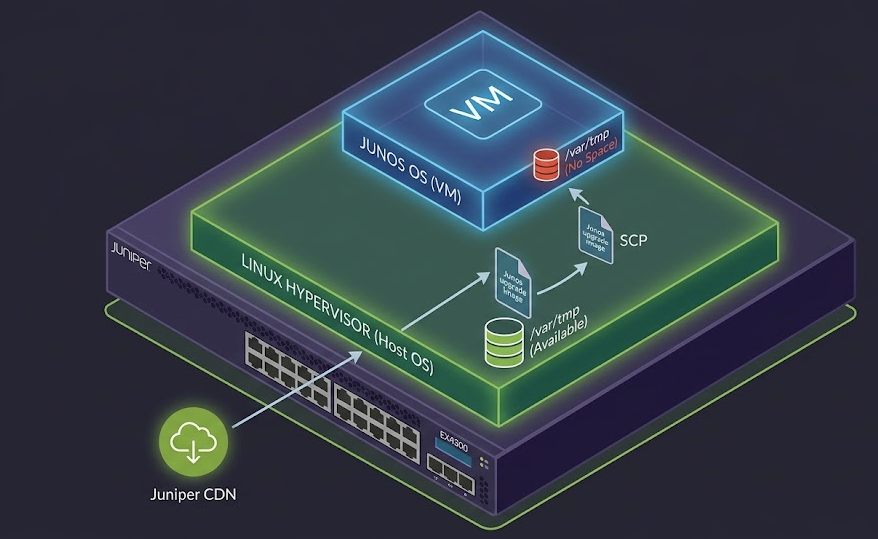
That’s the point where things get interesting. You are now at the hypervisor-level but the hypervisor (in my case) does not know about routing-instances and such – so there was no direct connectivity to fetch the file from the Juniper CDN… So while the hypervisor was perfectly capable of running the switch, it wasn’t exactly ready to download a Junos image from the Internet – and that’s by Design because otherwise you would open up the box to a whole lot of other issues…
The hypervisor had an eth0, and it was UP. But there was no IPv4 address on it that could be used for the download, no default route, and /etc/resolv.conf was empty. So the next job was to temporarily give the hypervisor access to the same management network that Junos was using. In my case, the switch management address was 172.16.100.4 on vme.0.
I assigned a temporary address to the hypervisor’s eth0:
ip addr add 172.16.100.92/24 dev eth0Obviously, 172.16.100.92 is just a placeholder here. You need an unused address from your actual “management” subnet.
Then I added the default gateway:
ip route add default via 172.16.100.1 dev eth0Again, the gateway needs to be whatever the actual gateway for mgmt_junos is in your environment – if you use mgmt_junos at all. At this point, I had full Layer 3 connectivity, but there was still one classic problem left – it was always D-N-S 😛
The hypervisor had no resolver configured, so:
curl https://cdn.juniper.net/...would fail with:
curl: (6) Couldn't resolve host 'cdn.juniper.net'So I temporarily configured DNS:
echo 'nameserver 9.9.9.9' > /etc/resolv.confThis is one of those little details that is easy to miss when troubleshooting. You can have a perfectly working default route and still have absolutely no “usable” Internet access if DNS isn’t configured.
Now we can actually download the image
With IP addressing, routing and DNS in place, the hypervisor could finally reach the Juniper CDN. I downloaded the image directly into the hypervisor’s /var/tmp:
curl -k -fL -o /var/tmp/jinstall-host-ex-4300mp-x86-64-25.2R2-S1.5-secure-signed.tgz \
"https://cdn.juniper.net/software/junossr/25.2R2-S1/jinstall-host-ex-4300mp-x86-64-25.2R2-S1.5-secure-signed.tgz?..."
The -k deserves a little explanation. The hypervisor’s CA bundle couldn’t validate the certificate presented by the CDN, so normal curl stopped with:
curl: (60) server certificate verification failedFor this controlled, one-time download, -k allowed us to continue. I wouldn’t recommend making curl -k your standard security policy but for my “quick and dirty” solution it’s the correct thing to do 😛 And now the large file was sitting on the hypervisor, where we had enough space.
Of course, the Junos VM still needs the file.
The hypervisor has internal networking to the Junos VM. In this case, we have the Interface called ctrlbr0:
128.0.0.xx/24After identifying the Junos VM’s address on that internal network (in my case it was .66), the image could be copied with scp:
scp /var/tmp/jinstall-host-ex-4300mp-x86-64-25.2R2-S1.5-secure-signed.tgz \
root@128.0.0.66:/var/tmp/
Now the file was finally where I wanted it to be – in my JunOS /var/tmp/ – Problem solved 🙂
Back in the Junos CLI:
request system software add /var/tmp/jinstall-host-ex-4300mp-x86-64-25.2R2-S1.5-secure-signed.tgz no-validate rebootThe installer extracted the package normally, detected the Host OS component, validated the Linux image, checked Secure Boot components and verified the checksums.
Eventually:
Host OS upgrade staged.
Reboot the system to complete installation!
followed by:
NOTICE: 'pending' set will be activated at next reboot...The switch then rebooted and, naturally, my SSH session disappeared… Because apparently rebooting the device we’re connected to still terminates the connection.
Who knew? 😏
For your internal Wiki, I created this little “programming-order” for you:
Junos CLI
  ↓
start shell user root
  ↓
Junos shell
  ↓
hshell
  ↓
Hypervisor
  ↓
assign temporary IP address, default-GW AND DNS
  ↓
download to hypervisor /var/tmp
  ↓
SCP to Junos VM via ctrlbr0
  ↓
Back to Junos cli to /var/tmp
  ↓
request system software add...
  ↓
Host OS + Junos staging
  ↓
reboot
And that’s the bit I like about these situations. New network engineers, normally operate inside the vendor’s abstraction layer or pure GUI. That’s exactly what makes an appliance useful. But when that abstraction tells you “there’s no space” or it just “breaks”, it doesn’t necessarily mean you’re stuck –> Sometimes you just have to look underneath. Because apparently even a switch occasionally needs a little Linux administration from the “old days”. Hope this helps whoever googles / ChatGPT’s this some time in the future, cursing the same way I did at that Switch 😉
Netzwerkonkel out. 😎